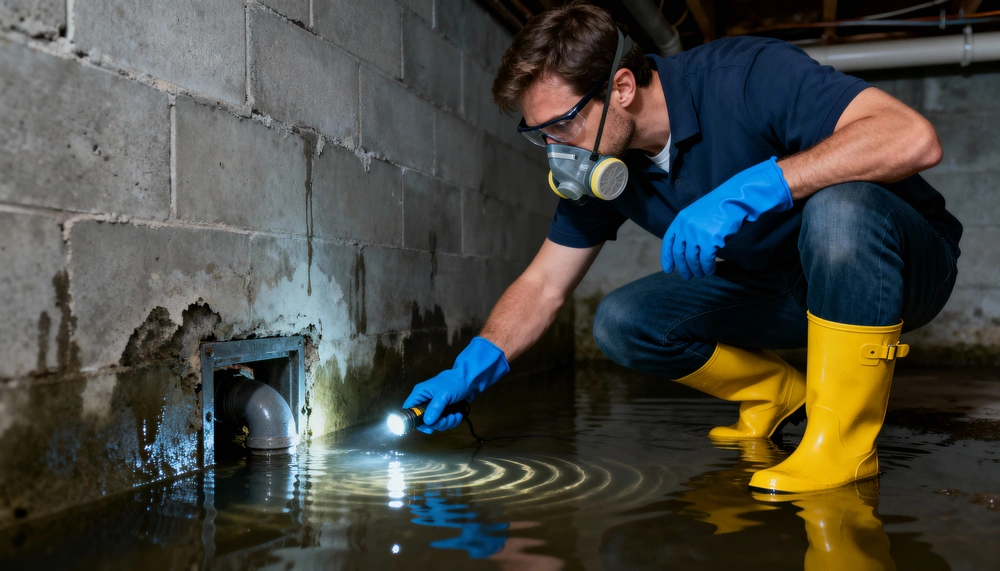
Protecting your basement from water damage is essential for any homeowner, especially in areas prone to flooding or heavy rainfall. Installing a sump pump is one of the most effective ways to prevent costly water issues and maintain a dry, safe living environment. This sump pump installation guide is designed for those new to home improvement projects, offering clear steps, practical tips, and important considerations to help you tackle the process with confidence.
Whether you’re dealing with a damp basement or simply want to add an extra layer of protection, understanding the basics of sump pump setup can save you time, money, and stress. Before diving into the installation process, it’s helpful to familiarize yourself with the tools required, safety precautions, and the benefits of having a reliable sump system in place.
If you’re interested in other practical home maintenance topics, you might also find value in learning how to sanitize a cast iron press between cooking sessions, which offers helpful cleaning and care tips for kitchen tools.
Why Install a Sump Pump?
A sump pump is a crucial device for preventing water accumulation in basements or crawl spaces. Its main function is to collect and redirect excess groundwater away from your home’s foundation, reducing the risk of flooding, mold growth, and structural damage. Homeowners who live in flood-prone regions or have experienced basement leaks in the past will especially benefit from installing this system.
Beyond protecting your property, a sump pump can also improve indoor air quality by minimizing moisture and mold. It’s a proactive investment that adds value to your home and provides peace of mind during storms or rapid snowmelt.
Essential Tools and Materials for Sump Pump Setup
Before starting your project, gather the necessary tools and supplies. Having everything on hand will streamline the process and help avoid unnecessary delays. Here’s a checklist to guide your preparation:
- Sump pump (submersible or pedestal type)
- Sump basin (pit liner)
- PVC piping and fittings
- Check valve
- Gravel
- Concrete mix
- Drill and masonry bit
- Shovel and digging tools
- Utility knife
- Pipe wrench
- Silicone sealant
- Level
- Protective gloves and safety glasses
Make sure to review the manufacturer’s instructions for your specific pump model, as requirements may vary.
Step-by-Step Sump Pump Installation Instructions
The following section outlines a beginner-friendly approach to setting up your new sump pump. Take your time with each step to ensure a safe and effective installation.
1. Choose the Right Location
Select the lowest point in your basement or crawl space, where water naturally collects. Avoid areas with utility lines or obstacles. Mark the spot for your sump basin.
2. Dig the Sump Pit
Use a shovel to dig a hole slightly wider and deeper than the sump basin. The pit should be deep enough to allow the pump to sit below the floor level, with a few inches of gravel at the bottom for drainage.
3. Install the Basin
Place the sump basin into the pit, ensuring it sits level and flush with the floor. Fill any gaps around the basin with gravel to promote drainage and stability.
4. Prepare the Discharge Line
Plan the route for the discharge pipe, which will carry water away from your home’s foundation. Drill a hole through the rim joist or wall for the pipe to exit. Attach the PVC piping to the pump’s outlet, using a check valve to prevent backflow.
5. Set Up the Sump Pump
Lower the pump into the basin, positioning it on a stable surface. Connect the discharge pipe and check all fittings for tightness. Plug the pump into a grounded electrical outlet—consider using a GFCI outlet for added safety.
6. Test the System
Pour water into the basin to check the pump’s operation. The float switch should activate, and water should be pumped out through the discharge line. Inspect for leaks and ensure the system runs smoothly.
7. Seal and Finish
Patch the area around the basin with concrete mix, smoothing it to match the surrounding floor. Allow the concrete to cure fully before placing any items nearby.
Common Mistakes to Avoid During Sump Pump Projects
Even with a detailed sump pump installation guide, beginners can encounter pitfalls. Here are some frequent errors and how to prevent them:
- Skipping the check valve, which can cause water to flow back into the pit.
- Improperly sealing the discharge pipe, leading to leaks or water damage.
- Choosing an inadequate pit location, resulting in poor drainage.
- Neglecting to test the pump before finishing the project.
- Failing to direct the discharge line far enough from the foundation.
Taking the time to double-check each step will help ensure your system works reliably for years to come.

Maintenance Tips for Long-Term Sump Pump Performance
Once your sump pump is installed, regular maintenance will keep it functioning optimally. Here are some best practices:
- Test the pump every few months by pouring water into the basin.
- Clean the basin and remove any debris that could clog the pump.
- Inspect the discharge line for blockages or freezing during winter.
- Check the power source and consider a battery backup for outages.
- Replace worn-out parts according to the manufacturer’s recommendations.
For additional insight into how technology is helping homeowners and communities manage water risks, explore this overview of technologies combating flood risks worldwide.
Frequently Asked Questions
How do I know if I need a sump pump?
If your basement is prone to dampness, flooding, or you notice water pooling after heavy rain, installing a sump pump can help protect your property. Homes in low-lying areas or with poor drainage benefit most from this solution.
Can I install a sump pump myself, or should I hire a professional?
Many homeowners can complete the process with basic tools and careful planning, especially when following a comprehensive sump pump installation guide. However, if you’re unsure about electrical work or have a complex foundation, consulting a professional is recommended.
How often should I maintain or replace my sump pump?
Routine maintenance should be performed every few months, with a full inspection at least once a year. Most pumps last 7–10 years, but replacement intervals can vary based on usage and manufacturer guidelines.
By following these steps and tips, you can confidently set up a sump pump system that keeps your basement dry and your home protected. For more home care advice, consider reading about how to store corn masa for pressing to keep your kitchen staples fresh and ready for use.